
Hello wonderful Juniors! Welcome to all things words and baking! I’m so excited to be with you this year. Lets jump right in and get started. To begin with, here is your song and poem to review.
Song and Poem
Song: This Land Is Your Land https://www.youtube.com/watch?v=2Q7PULELvok
Poem:
The Ingenious Little Old Man
By John Bennett
A little old man or the sea
Went out in a boat for a sail;
The water came in
Almost up to his chin
And he had nothing with which to bail.
But this little old man of the sea
Just drew out his jack-knife so stout
And a hole with his blade
I the bottom he made,
So that all of the water ran out.
Book Club
Keep reading Indian in the Cupboard. If my calculations are correct, you have three more weeks to read this book. So grab some popcorn, find a blanket and get some cozy reading going!
Creative Spot
Alright, now that we have all of our other business taken care of, lets jump right in to all things word and baking!
Words, words, words, words, words. There they are. All around us. Everyday and all day long. Whether we hear them from others or just hear them within our heads. There they are. We just can’t get away from them. So I got thinking, this year, why not have some fun with words? Why not add some fun words to our vocabulary? Why not learn how to string words together in meaningful and fun ways? And why not train our brains to see that words, can be really fun!
1: Rebus
Do you know what a rebus is? Here is a definition I found on the internet: “A Rebus is a fun puzzle that uses pictures, symbols and words to create a secret message or phrase that you have to guess, like a code. It’s like playing a game with your brain where you look at the clues and use your imagination and the sounds of the words to figure out the hidden saying. For example a picture of an eye, a heart, and a picture of an ewe (pronounced you) could be a rebus for “I love you” because the picture sounds like those words. ” Lets try some together.
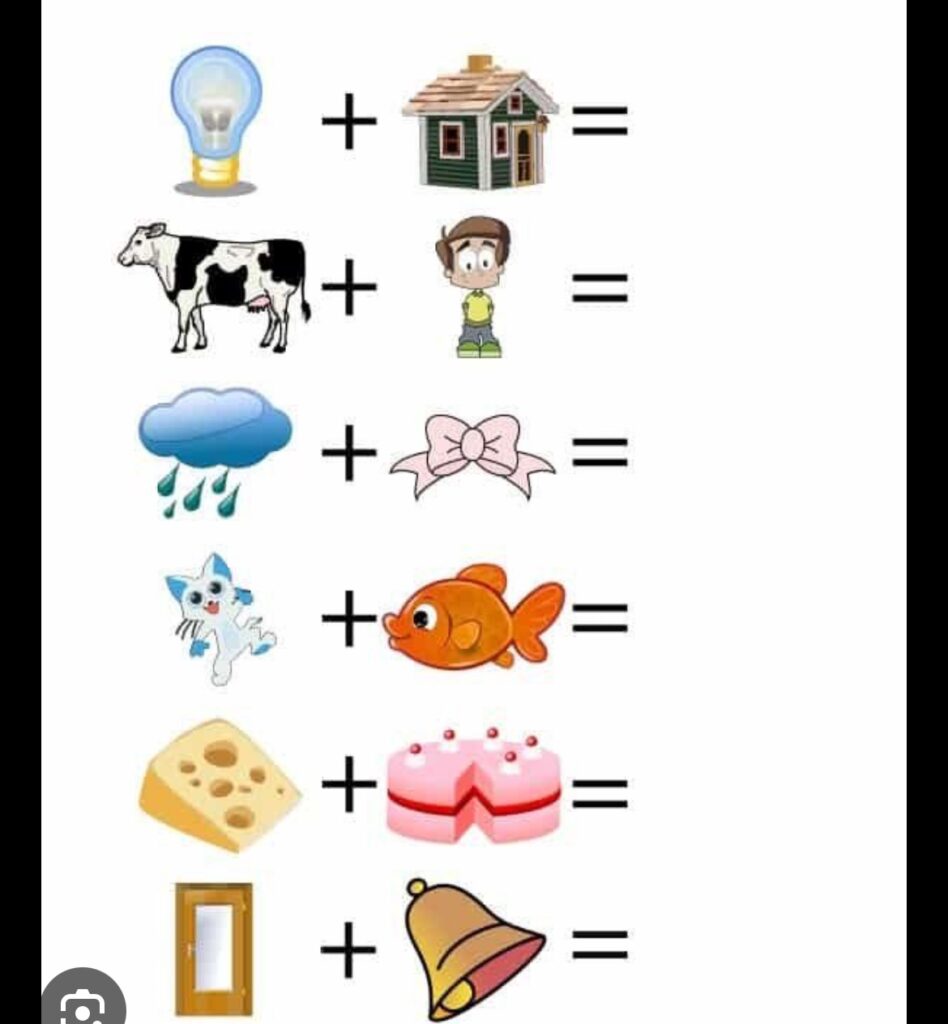
Did you get any of them? First one, light plus house. Lighthouse. Second one, cow plus boy. Got it? Cowboy. Third one, rain plus bow. Rainbow. Fourth, catfish. Fifth, cheesecake. Lastly, doorbell. I think you are getting it.
Now lets have you try these on your on. Grab your journal. Label a section, REBUS. Then number your paper 1-5. Write down each answer and bring your journal to class.
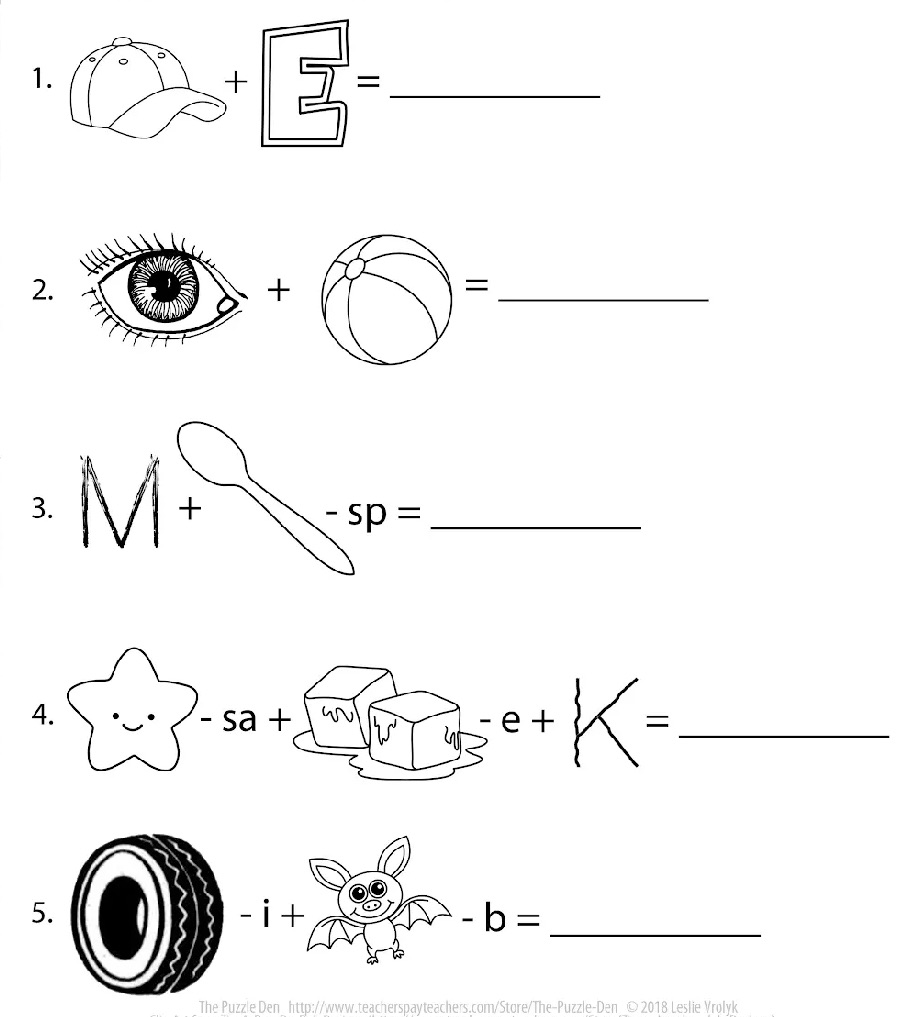
How did it go? Can you come up with any on your own? I think it would take me a while to create one, but feel free to give it a try. You don’t have to, but if you do figure one out, bring it to class and I will give you an extra van buck!
Alright, now on to our next thing.
2: Vocabulary words
Vocabulary words?! What in the world are vocabulary words? Is that what you just asked yourself? The word vocabulary means the collection of words that you know and or use regularly. This year, we are going to ADD to your vocabulary by having you learn, memorize and USE some fun new words. Now, you may think that this is a big waste of time or that this will be really difficult. But think about it, if you didn’t ALREADY have the habit of adding NEW words into your vocabulary, especially because you thought it would be to hard, you would still be goo’ing and crying to get what you want like a little baby. Adding words to your life was easy as a baby and is still easy today! So let’s dive in. (Learning new words can be so fun. It can make you laugh. It can increase your ability to more accurately express yourself. Perhaps this little clip will inspire you.)
Vocabulary Word Instructions:
Step 1: Read through each word and their definitions. Make sure you can say each word correctly.
Step 2: Click on the pronunciation guide for each word
Step 3: Grab your Vangaurd journal and find a section where you can keep ALL of your new vocabulary words for the year. Write down each word AND their definitions.
Step 4: After you have written each word and their definition in your journal, write (in the same journal on the same page as your definitions) a sentence for each word. For example, I may write for the the word Bumbershoot, “I must quickly grab my bumbershoot because it is starting to rain!”
Step 5: Grab and index card or a plain piece of paper. Write down each work. Put the piece of paper on the fridge or somewhere you can see it OFTEN. Make it a point to use each word at least THREE times a day. Each time you use a word, put a little check mark next to it so you can keep track.
| Bumbershoot | another word for umbrella |
| Befuddled | means to be confused or bewildered |
| Collywobbles | a feeling of nervousness or unease |
Finally, the last activity for our WORDS WORDS WORDS section.
3: Unjournaling
Now that you have awakened your brain with some riddles and added to it some new fun words, let’s dive into our unjournaling book. This week I want you to complete ONE writing prompt from your unjournaling book, HOWEVER I would like you to choose between #3, #4, and #6. Write your response in your vanguard journal and be sure to bring it to class! NOTE: if scribing for your own thoughts (or in other words, writing your own thoughts down) is to difficult, feel free to ask a mom or sibling to be your scribe. Writing is the process of getting your thoughts and feelings and beliefs on to paper, but you don’t always have to be the one who puts the pencil to the paper. That’s call scribing. Some people have excellent thoughts and ideas and can express them verbally quite well but have a hard time using a pencil, spelling words that their mouths are use to using or find that it simply takes SO LONG that it sucks all the fun out of the creative part of creative writing. If you find this is you, ask someone to be your scribe for a while until you can catch up on these other skills!
All Things Baking
Phew! Good job with all those word work outs! No let’s zip our lips and get baking. I LOVE to bake.

But I will be honest, not everything I have made has been delicious. And WHAT A BUMMER! Don’t you hate that? When you get excited to make something, you take tons of time making it, making a huge mess in the process and then… whamo flop! It’s nothing like you had anticipated. I have been there and truly what a bummer. My goal this year is to teach you a few tricks and tips that will help that possibly be less. Now I say possibly, because baking is actually a science. They call it food science at byu because it has a LOT of chemistry in it. Most bakers don’t really understand the ins and outs of chemistry but they do understand the baking requires just as much precision in some areas as it does creativity and skill in others. Let’s take cake baking for example. Did you know that if you over mix your cake batter, your cake will sink in the middle while baking? Or if you use butter that is too warm when you make buttercream frosting to FROST your cake, the frosting will be too runny and will actually slip right off your cake! Ker-plop! Baking requires some good knowledge and skills, and that my friends is what I am hoping to pass along to you. Ready? Lets begin!
Homemade Chocolate Cake
This week you will be making a 9X13 inch rectangular homemade chocolate cake, allowing it to cool, wrapping it in plastic wrap, putting it in the freezer then will bring it to class still wrapped and frozen where we will mix up some butter cream that you will use to frost your cakes! I will be bringing a home baked store bought box cake mix cake along with a homemade chocolate cake where we will do some comparisons, including a blind food taste test to see if you can tell the difference. Yum!
This chocolate cake is a really easy cake. Cakes can actually be really easy. Plus, homemade cakes, are WAYYYY better for you than the ones at the store. Sure they have sugar in them but the ones at the store that come in a box are usually chuck full of ingredients that are hard on your body. I imagine that most people make a box cake from the store because they are afraid that baking a cake from scratch will be too difficult. NOT SO MY FRIENDS! This week I am hoping to dispel that myth.
If you are going to take the time to make a cake though, we do want to do what we can to make it turn out as well as possible. SO, here’s the TOP 10 tips for this recipe:
1- Use a scale. Food scales help you actually get the actual amount the person creating the recipe actually is ASKING you to use. We will do a fun little thing in class to help you see some of the variety of ways people can measure that may be different from they way YOU measure
2. Pay close attention to the part in the recipe where it says, “ROOM TEMPERATURE.” This is a science moment. If you don’t follow this step, your recipe will likely turn out different than the persons who created the recipe and not in a good way. Temperature changes the way an ingredient acts or interacts. interact with each other. Think about it. What happens to cream when it gets REALLY cold? It freezes. What happens to solid butter when it gets really hot? It melts. For some ingredients, TEMPERATURE MATTERS!!!!!! DO NOT SKIP THAT STEP!
3. USE PARCHMENT PAPER! If you don’t have any, have your mom text me and I will run some down to you. Parchment paper, I am quite convinced is heavenly mothers created gift for all mortal mother bakers! CUT IT TO THE RIGHT SIZE OF YOUR PAN! Don’t have it too small or too large. For this recipe, the parchment paper should sit ever so flat, right to EVERY edge of your 9X13 pan. If it’s too small, that part of the cake will stick. If it is too LARGE it compromises or changes in a bad way, how strong the edges of your cake will be, and they have a high possibility of crumbling!
4. Spray your pan, THEN put the parchment paper in and then SPRAY THE PARCHMENT PAPER once it is in the pan. So you will actually be using the spray TWICE.
5. When adding the “hot water,” make sure the temperature is actually closer to a nice bath tub temperature rather than HOT. HOT will cause the eggs to cook when you add all of the wet ingredients together.
6. Use a wire wisk, NOT a hand mixer for this cake
7. DO NOT OPEN THE DOOR WHILE YOUR CAKE IS COOKING. This is a science thing again, it will cause it to fall.
8. To test if your cake is done, remember these four words: WINDOW, OPEN, TAP, POKE. First look through the window, . Look at the middle of the cake. Is it as high as the rest of the cake? If not, it is LIKELY NOT DONE. Give it a few more minutes. Each oven is different. Sometimes the oven temp inside is not actually what it says it is on the outside and your cake will need to take longer. Second, if it does look about even, crack the door ever so slightly. Look at the color and texture. If the cake has the SAME TEXTURE all along the top, it is likely done. If the VERY CENTER of the cake looks different than the rest of the cake, it’s likely NOT done yet. If it does look the same, take a finger and lightly touch the middle. If your finger leaves an indentation, it is NOT done. If it does not, it is likely done. IF YOU HAVE PASSED ALL THE TESTS OF DONENESS UP UNTIL NOW, THEN poke with a skewer or a tooth pick. It should come out COMPLETELY CLEAN. If not, it is not finished yet.
9. When you take your cake out, let it sit in the pan for 10 minutes. Gently take a very thin METAL knife to go around the edges of the pan. DO NOT CUT INTO THE CAKE!!!!! Just go along the very edges of the pan. SCRAPE THE PAN NOT THE CAKE! Then invert it (or tip it upside down) onto a clean kitchen towel or a lightly sprayed cooling rack and remove the parchment paper. Let it sit until COMPLETELY COOL! If you wrap it up to put it in the fridge, it will before it will be terribly soggy when it thaws.
10. Wrap it syran or plastic wrap and put it in the freezer. MAKE SURE IT IS ON SOMETHING FLAT in the freezer or it can break, or stick to the rack of the freezer!
Okay, time to get baking. Be sure to bring STOP the recipe when it gets to the buttercream part and bring your tasty frozen, wrapped cake to class carefully so it won’t break or get squished! Have fun!
-Your little dash of Jinger
